> ## Documentation Index
> Fetch the complete documentation index at: https://agency-swarm.ai/llms.txt
> Use this file to discover all available pages before exploring further.
# n8n
> Connect your Agencii agents to n8n workflows using the Agencii community node.
## Feature Overview
n8n is a flexible workflow automation platform that lets you connect dozens of services in visual flows. The Agencii **n8n community node** (`n8n-nodes-agencii`) connects your agents to these workflows so your agencies can receive tasks, run tools, and send back answers directly inside n8n.
## Prerequisites
* **Agencii Platform account** with at least one deployed agency and agent.
* **Platform API Key** – available under **Settings → API Keys** in the Agencii dashboard.
* **n8n instance** with permissions to install **Community Nodes**.
Existing users currently need to use a self-hosted n8n instance to install the Agencii community node, as the `n8n-nodes-agencii` npm package is in the process of verification. For more details on how this works in n8n, see the n8n community nodes installation guide at [https://docs.n8n.io/integrations/community-nodes/installation/](https://docs.n8n.io/integrations/community-nodes/installation/).
## Step 1: Set up n8n Integration in Agencii
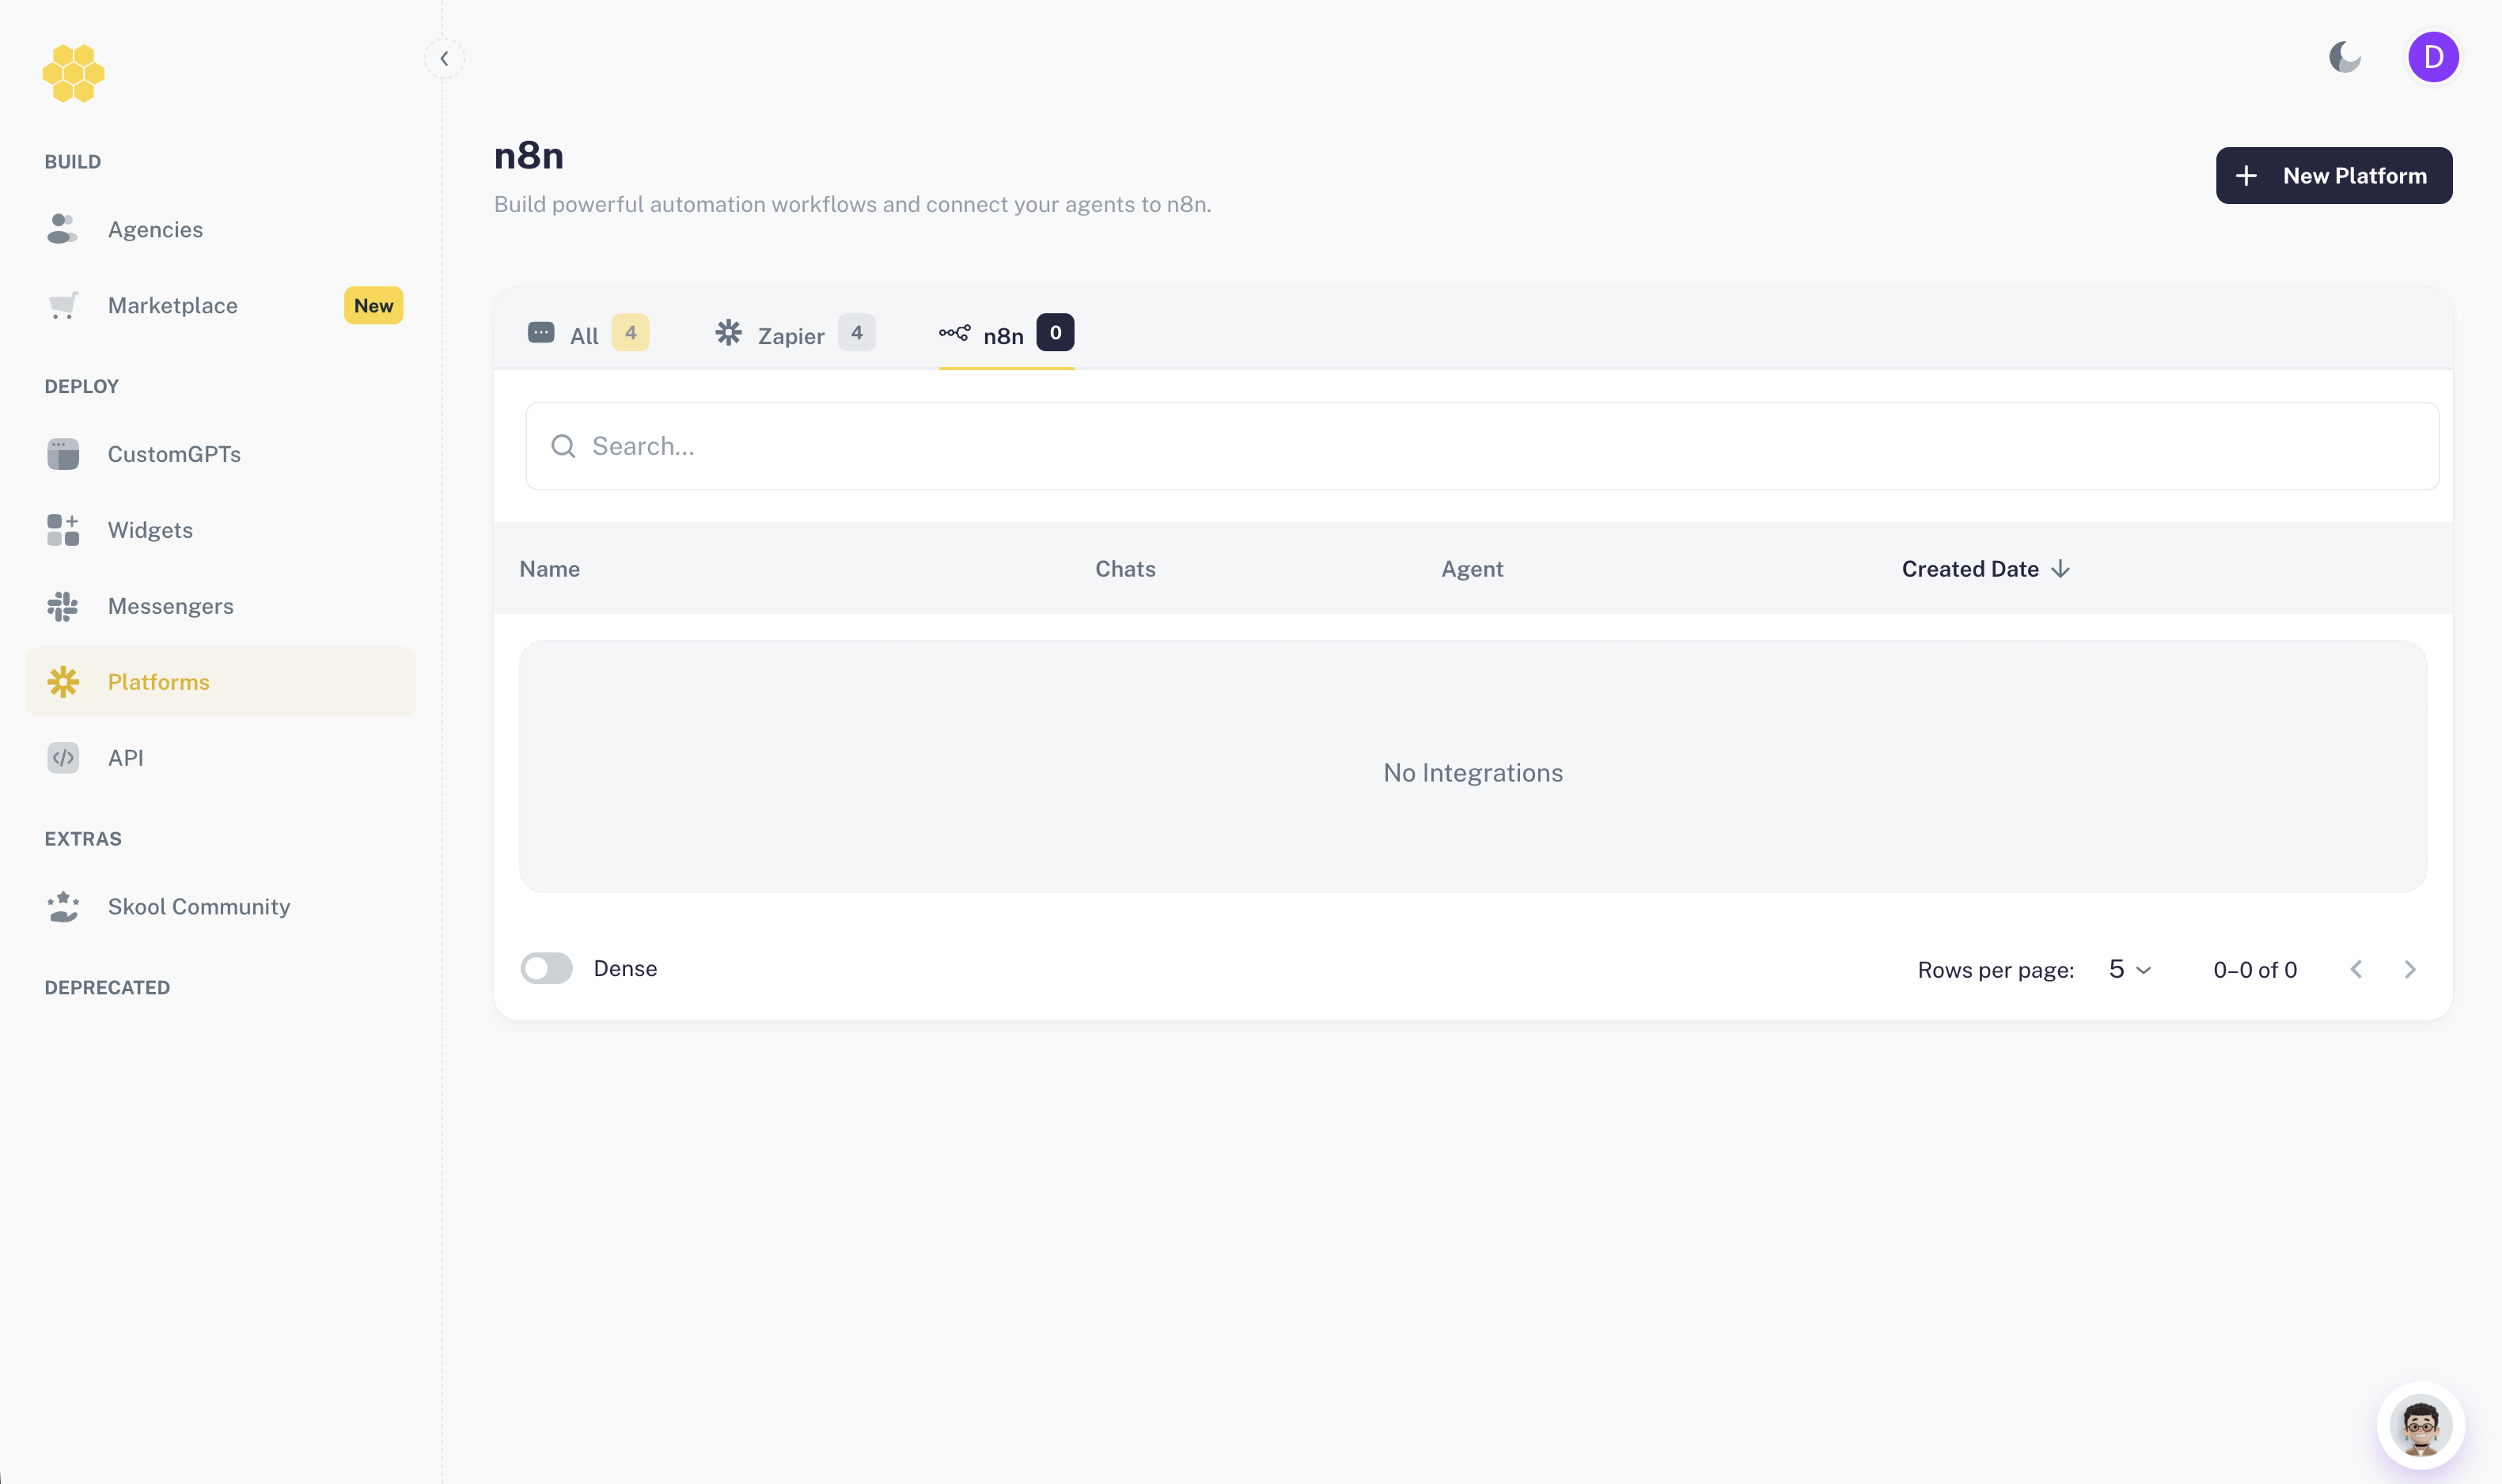
1. In the Agencii dashboard, open **Deploy → Platforms** from the sidebar and click **New Platform**.
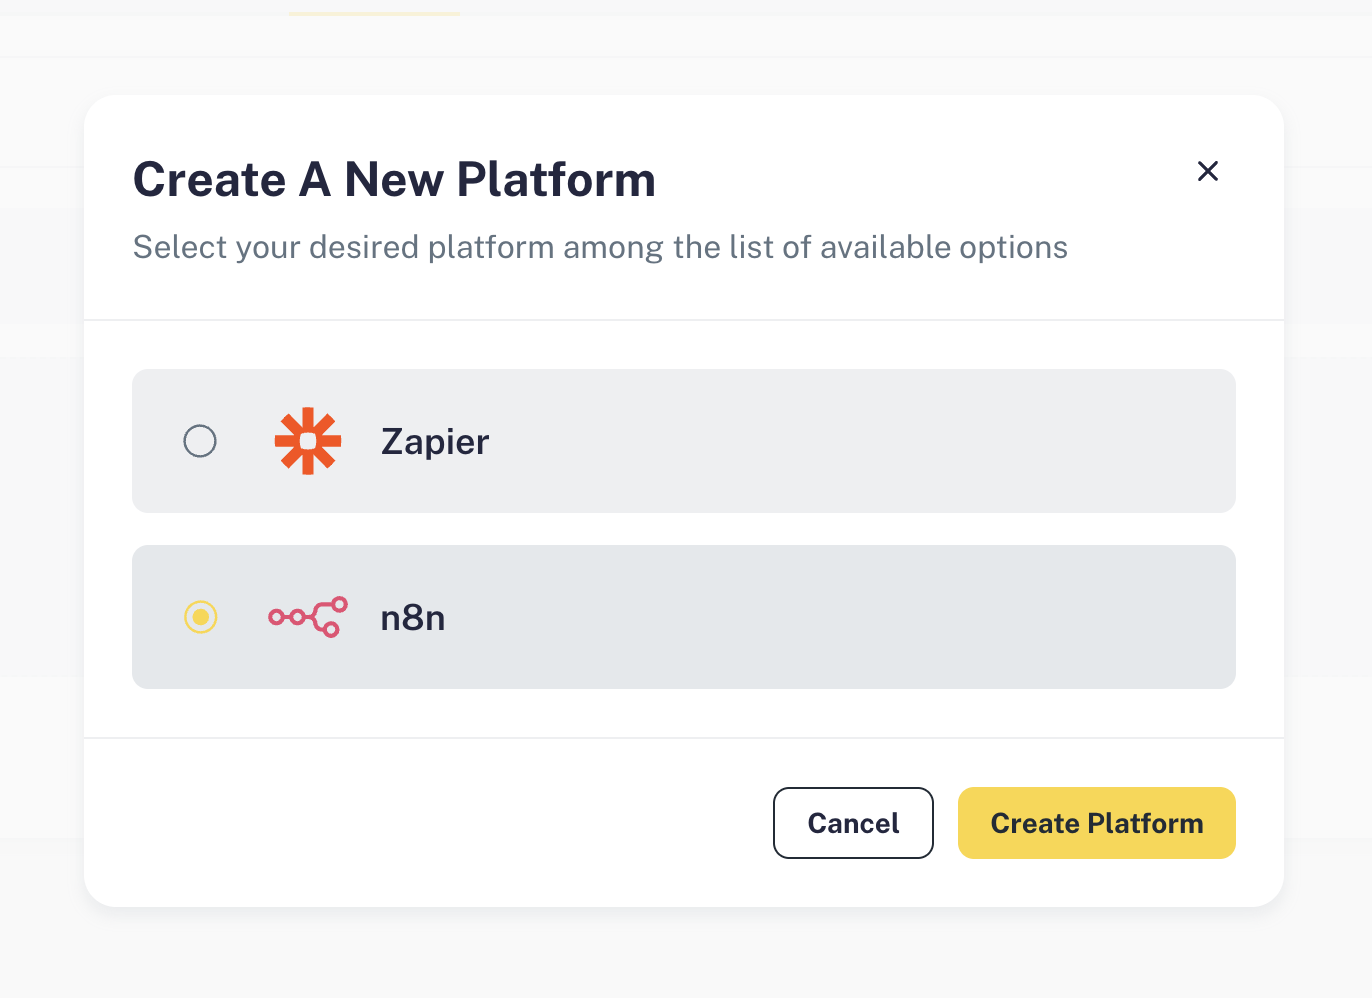
 2. In the **Create a New Platform** dialog, select **n8n** and click **Create Platform**.
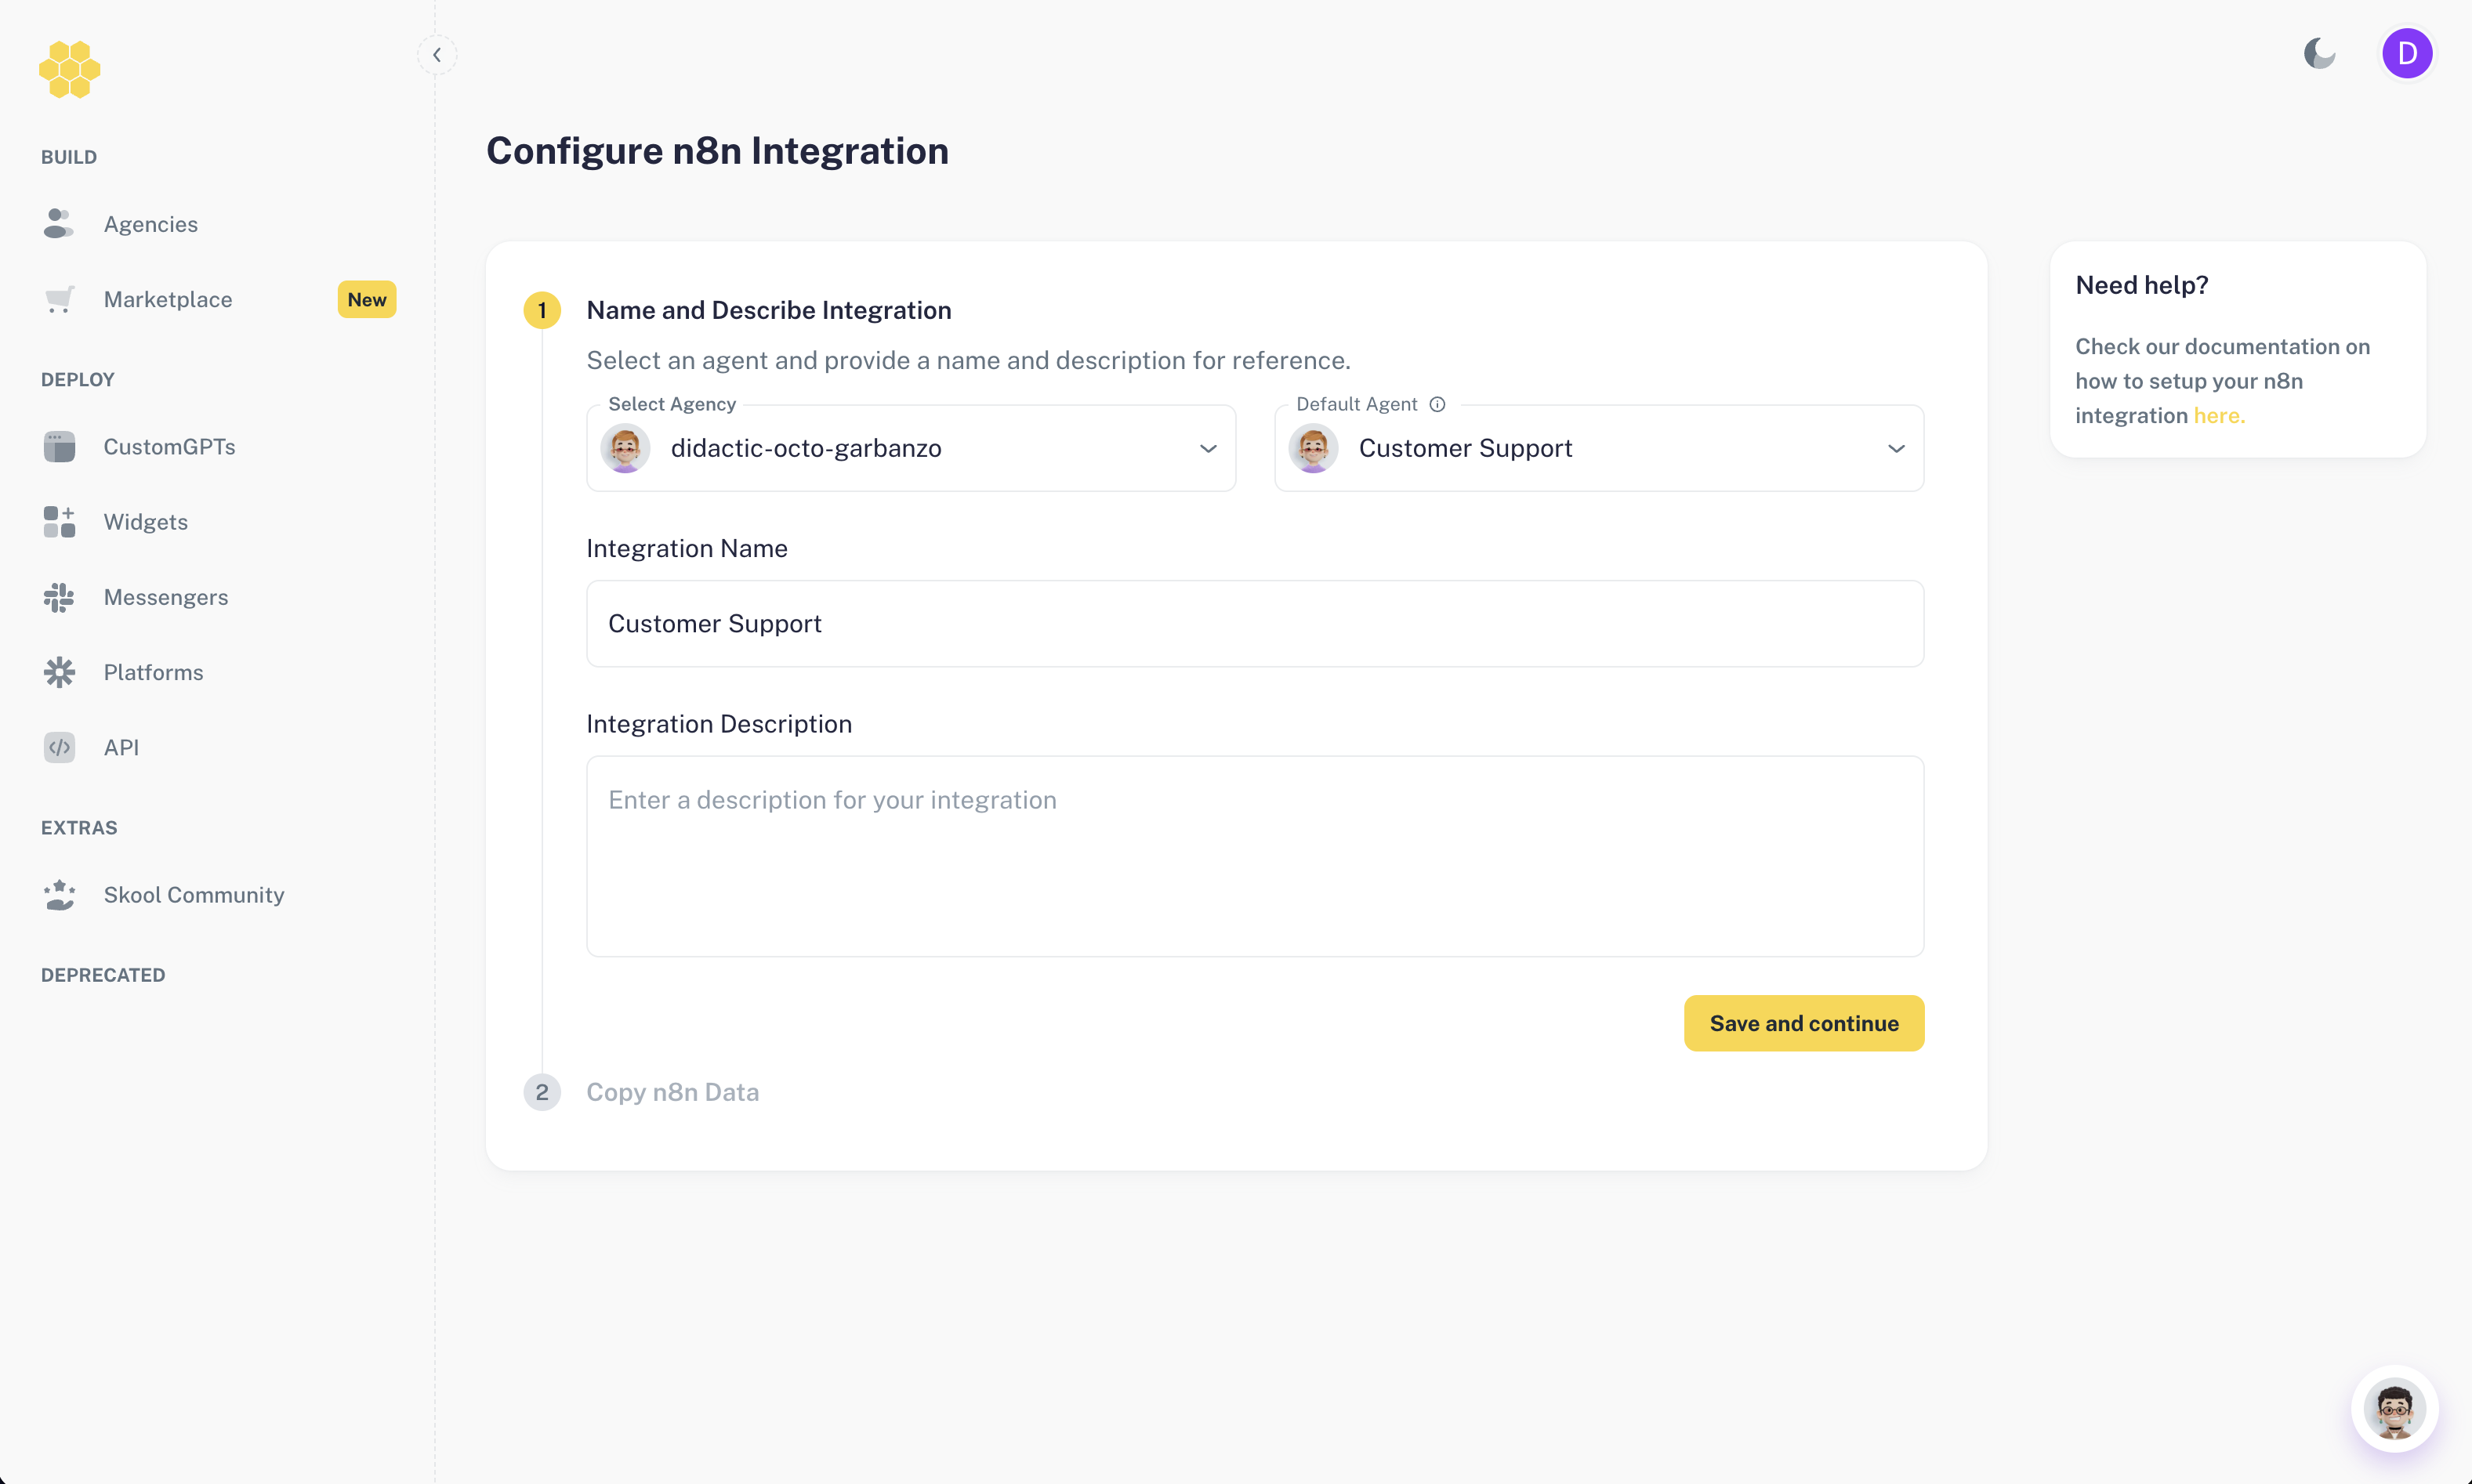
 3. On the **Configure n8n Integration** screen, choose:
* **Agency** – the agency you want n8n to talk to.
* **Default Agent** – the agent that will receive messages from this integration.
* **Integration Name** – an internal name that will also help you identify the node inside n8n.
* **Integration Description** – optional context for future reference.
4. Click **Save and continue**.
3. On the **Configure n8n Integration** screen, choose:
* **Agency** – the agency you want n8n to talk to.
* **Default Agent** – the agent that will receive messages from this integration.
* **Integration Name** – an internal name that will also help you identify the node inside n8n.
* **Integration Description** – optional context for future reference.
4. Click **Save and continue**.
 After saving, you’ll see the **Copy n8n Data** screen. It includes:
* **NPM package name**: `n8n-nodes-agencii` – used to install the node in n8n Community Nodes.
* **Integration ID** – a unique identifier that routes messages from n8n to this specific Agencii integration.
* **API Key hint** – your first platform API key (you can manage keys under **Settings → API Keys**).
After saving, you’ll see the **Copy n8n Data** screen. It includes:
* **NPM package name**: `n8n-nodes-agencii` – used to install the node in n8n Community Nodes.
* **Integration ID** – a unique identifier that routes messages from n8n to this specific Agencii integration.
* **API Key hint** – your first platform API key (you can manage keys under **Settings → API Keys**).
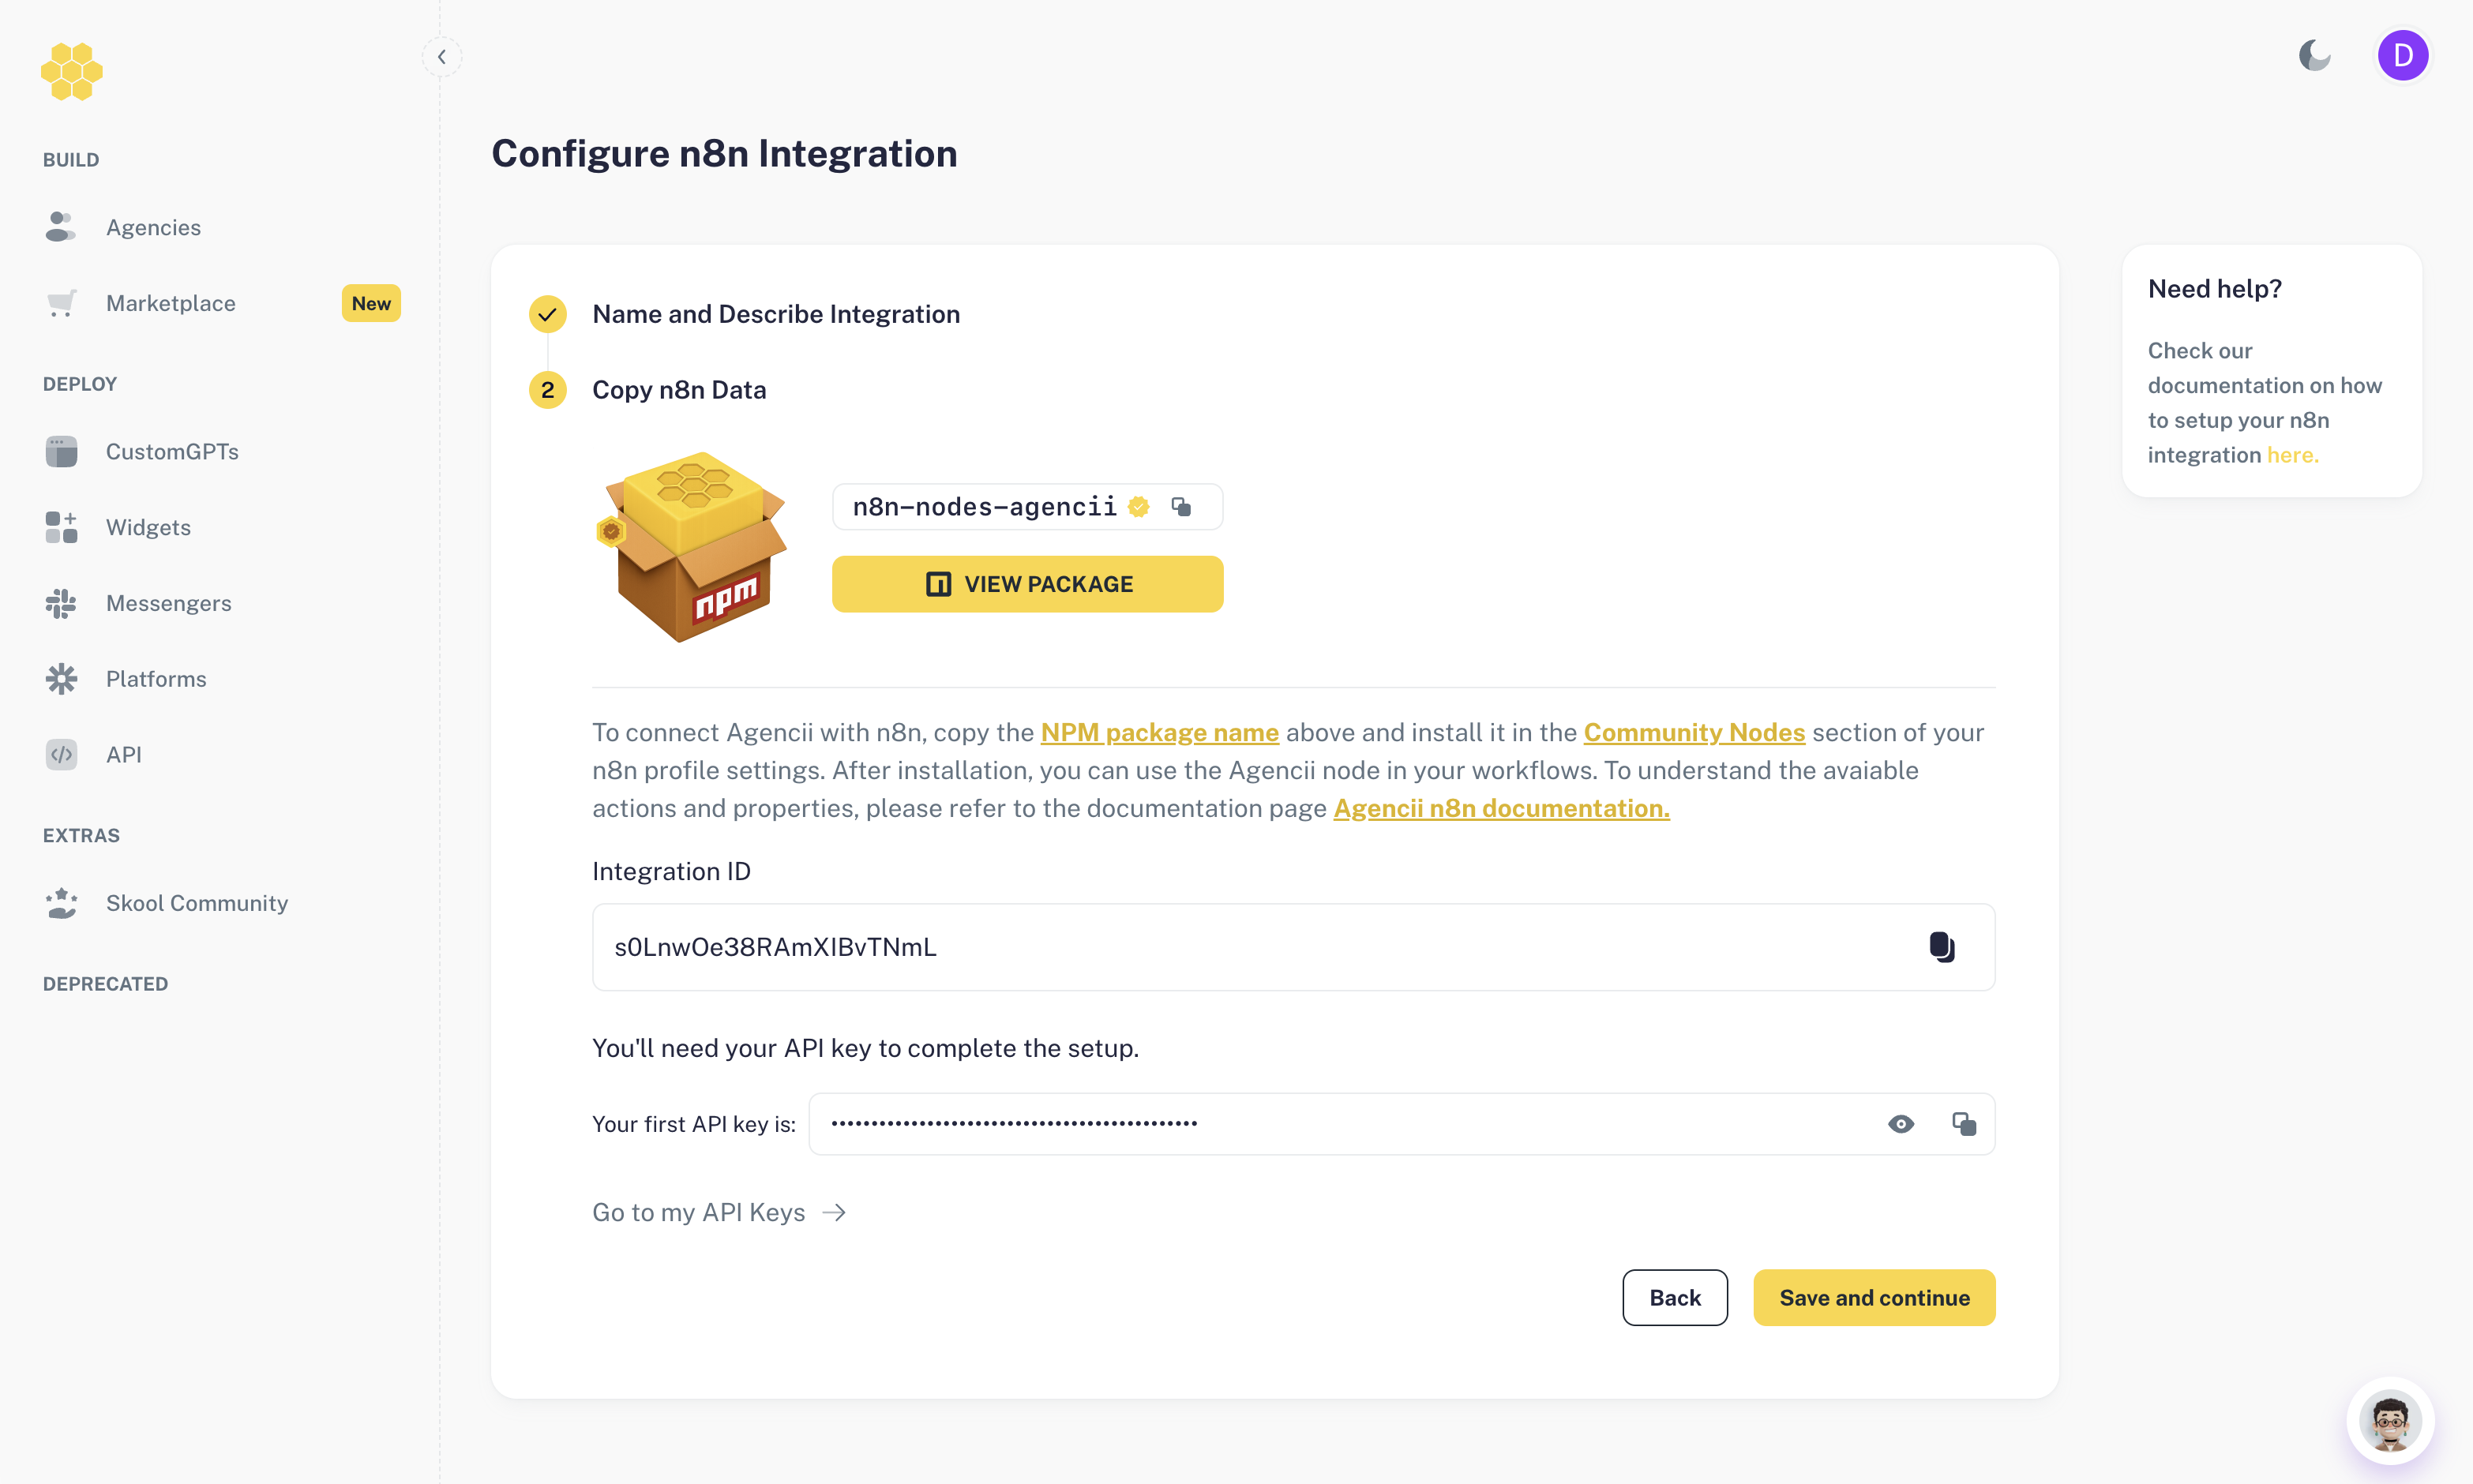 Keep the **Integration ID** handy—you’ll paste it into the Agencii node inside n8n.
To connect Agencii with n8n, copy the NPM package name above and install it in the **Community Nodes** section of your n8n profile settings. After installation, you can use the **Agencii** node in your workflows. To understand the available actions and properties, please refer to the Agencii n8n documentation page.
## Step 2: Install the Agencii Community Node in n8n
Keep the **Integration ID** handy—you’ll paste it into the Agencii node inside n8n.
To connect Agencii with n8n, copy the NPM package name above and install it in the **Community Nodes** section of your n8n profile settings. After installation, you can use the **Agencii** node in your workflows. To understand the available actions and properties, please refer to the Agencii n8n documentation page.
## Step 2: Install the Agencii Community Node in n8n
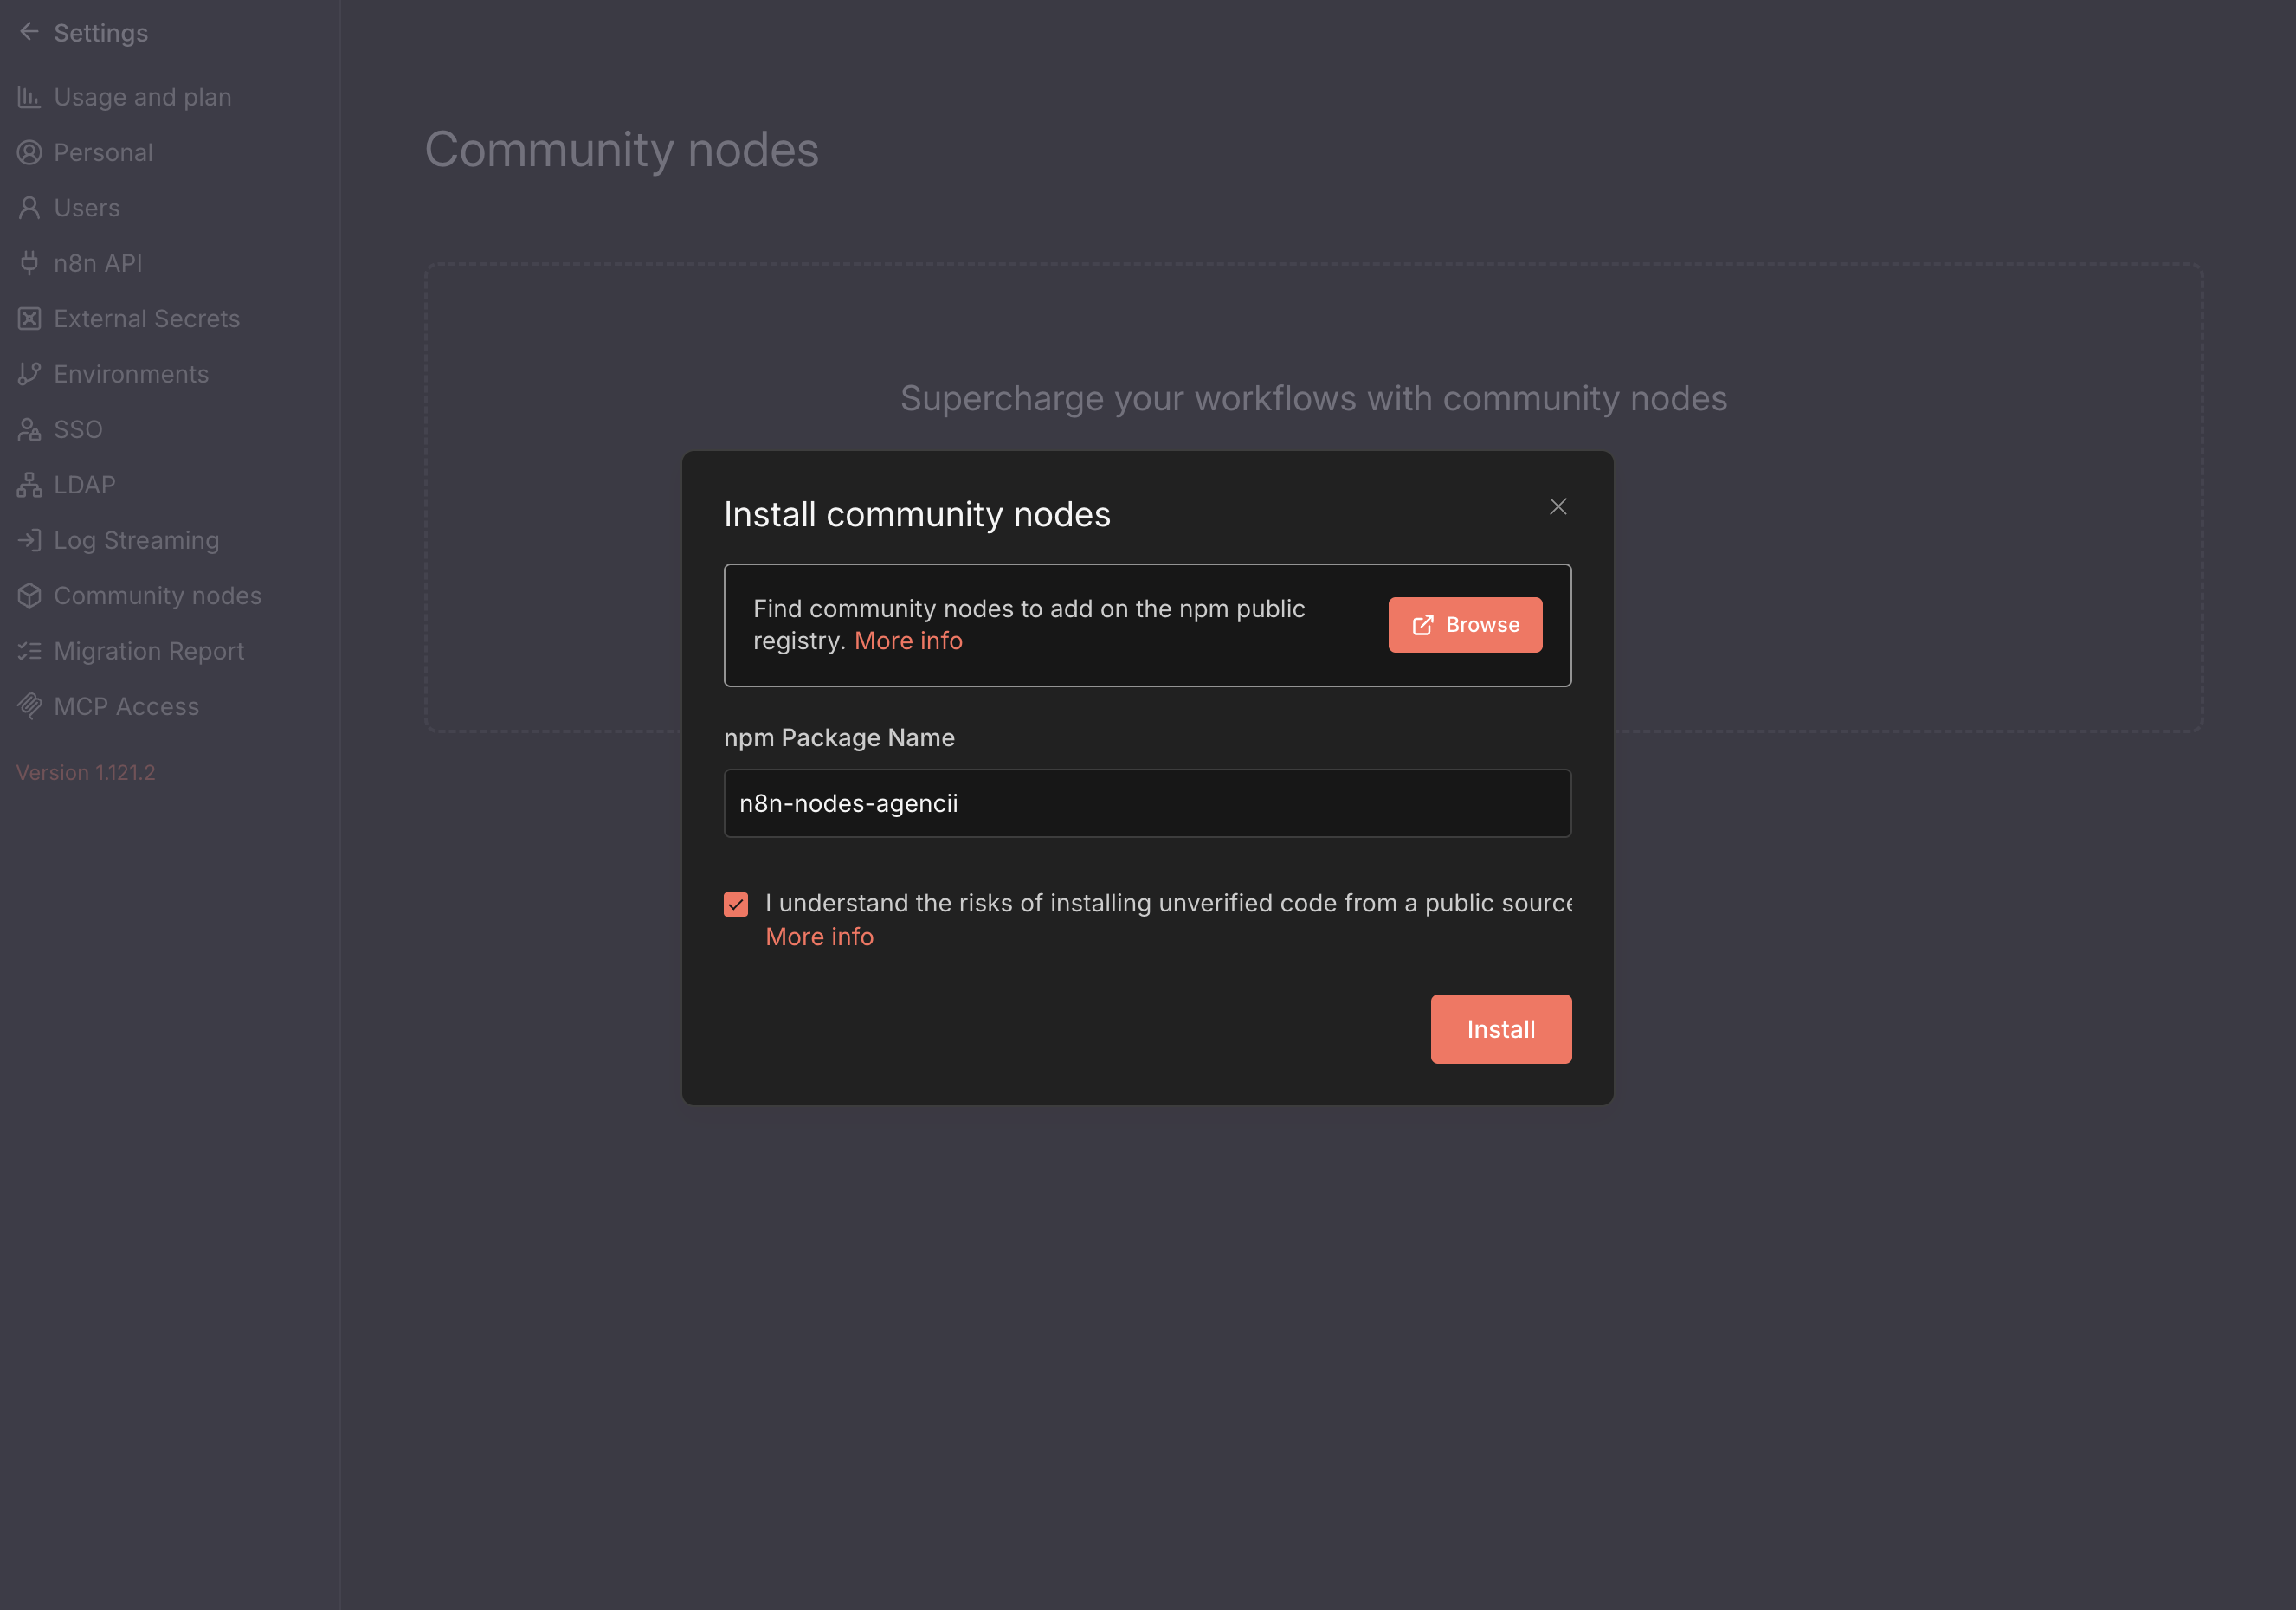 1. In your n8n instance, go to **Settings → Community Nodes**. You can learn more about installing and managing community nodes in the official n8n docs at [https://docs.n8n.io/integrations/community-nodes/installation/](https://docs.n8n.io/integrations/community-nodes/installation/).
2. Click **Install** and enter the package name:
```bash theme={null}
n8n-nodes-agencii
```
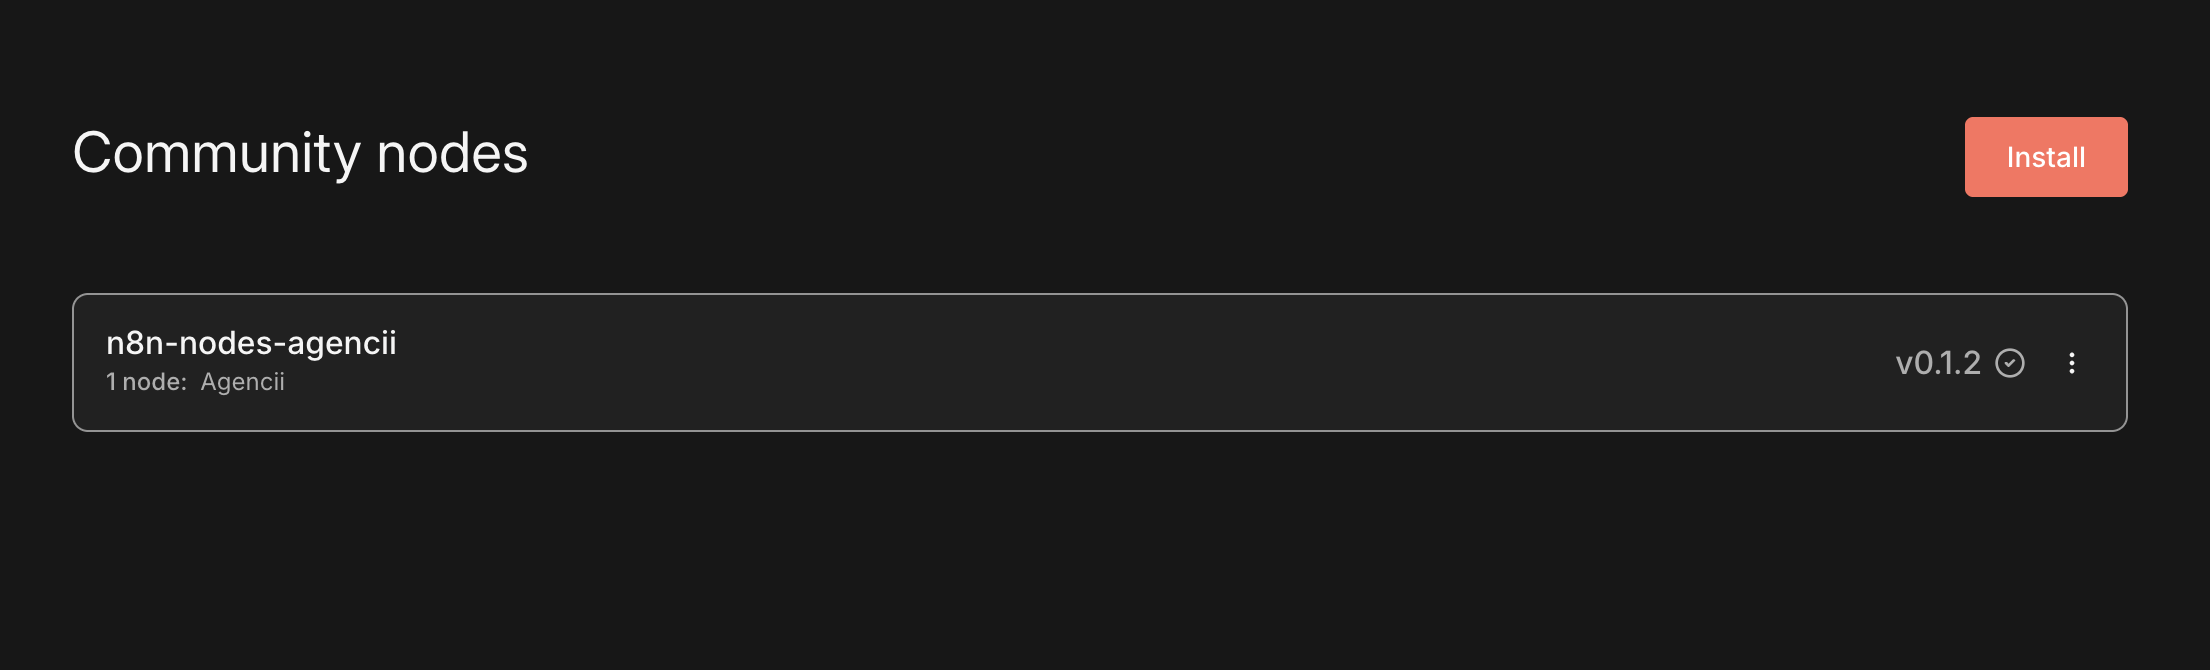
3. Confirm the installation. After it completes, an **Agencii** node will appear in your n8n node palette.
1. In your n8n instance, go to **Settings → Community Nodes**. You can learn more about installing and managing community nodes in the official n8n docs at [https://docs.n8n.io/integrations/community-nodes/installation/](https://docs.n8n.io/integrations/community-nodes/installation/).
2. Click **Install** and enter the package name:
```bash theme={null}
n8n-nodes-agencii
```
3. Confirm the installation. After it completes, an **Agencii** node will appear in your n8n node palette.
 ## Step 3: Use the Agencii Node in a Workflow
The Agencii node exposes a single operation designed to send messages to your agency and receive structured responses.
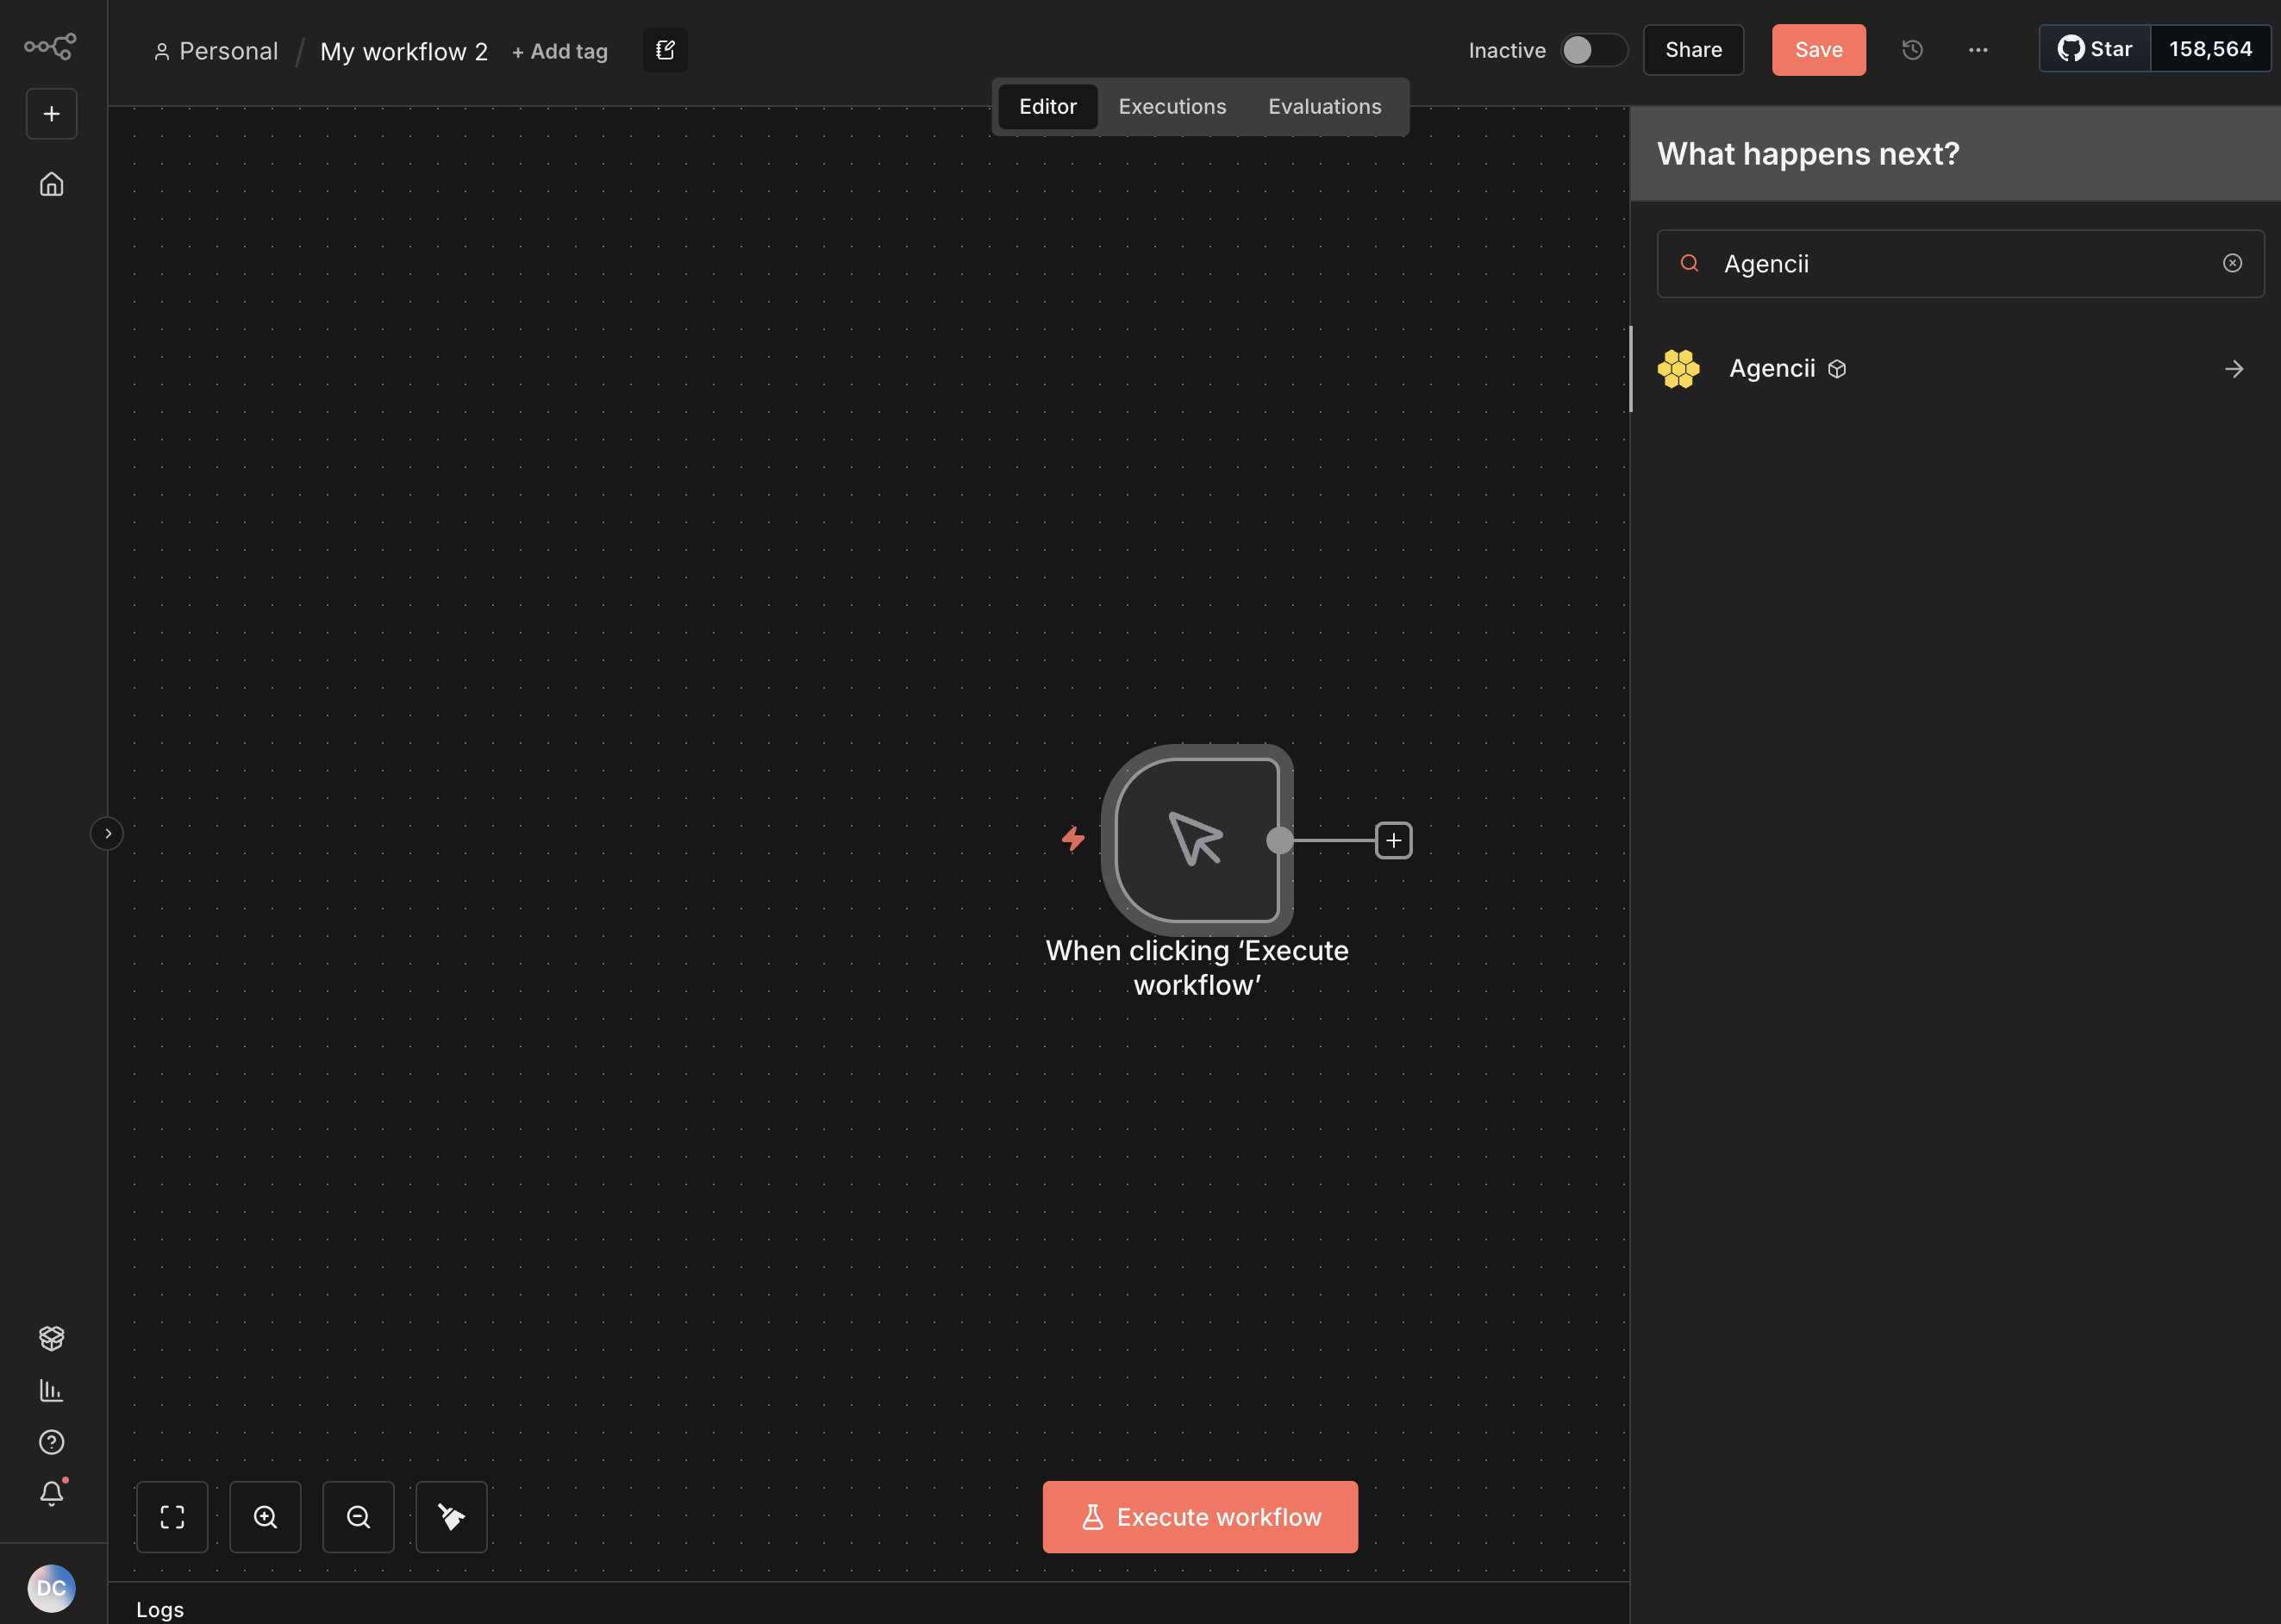
1. Add an **Agencii** node to your workflow.
## Step 3: Use the Agencii Node in a Workflow
The Agencii node exposes a single operation designed to send messages to your agency and receive structured responses.
1. Add an **Agencii** node to your workflow.
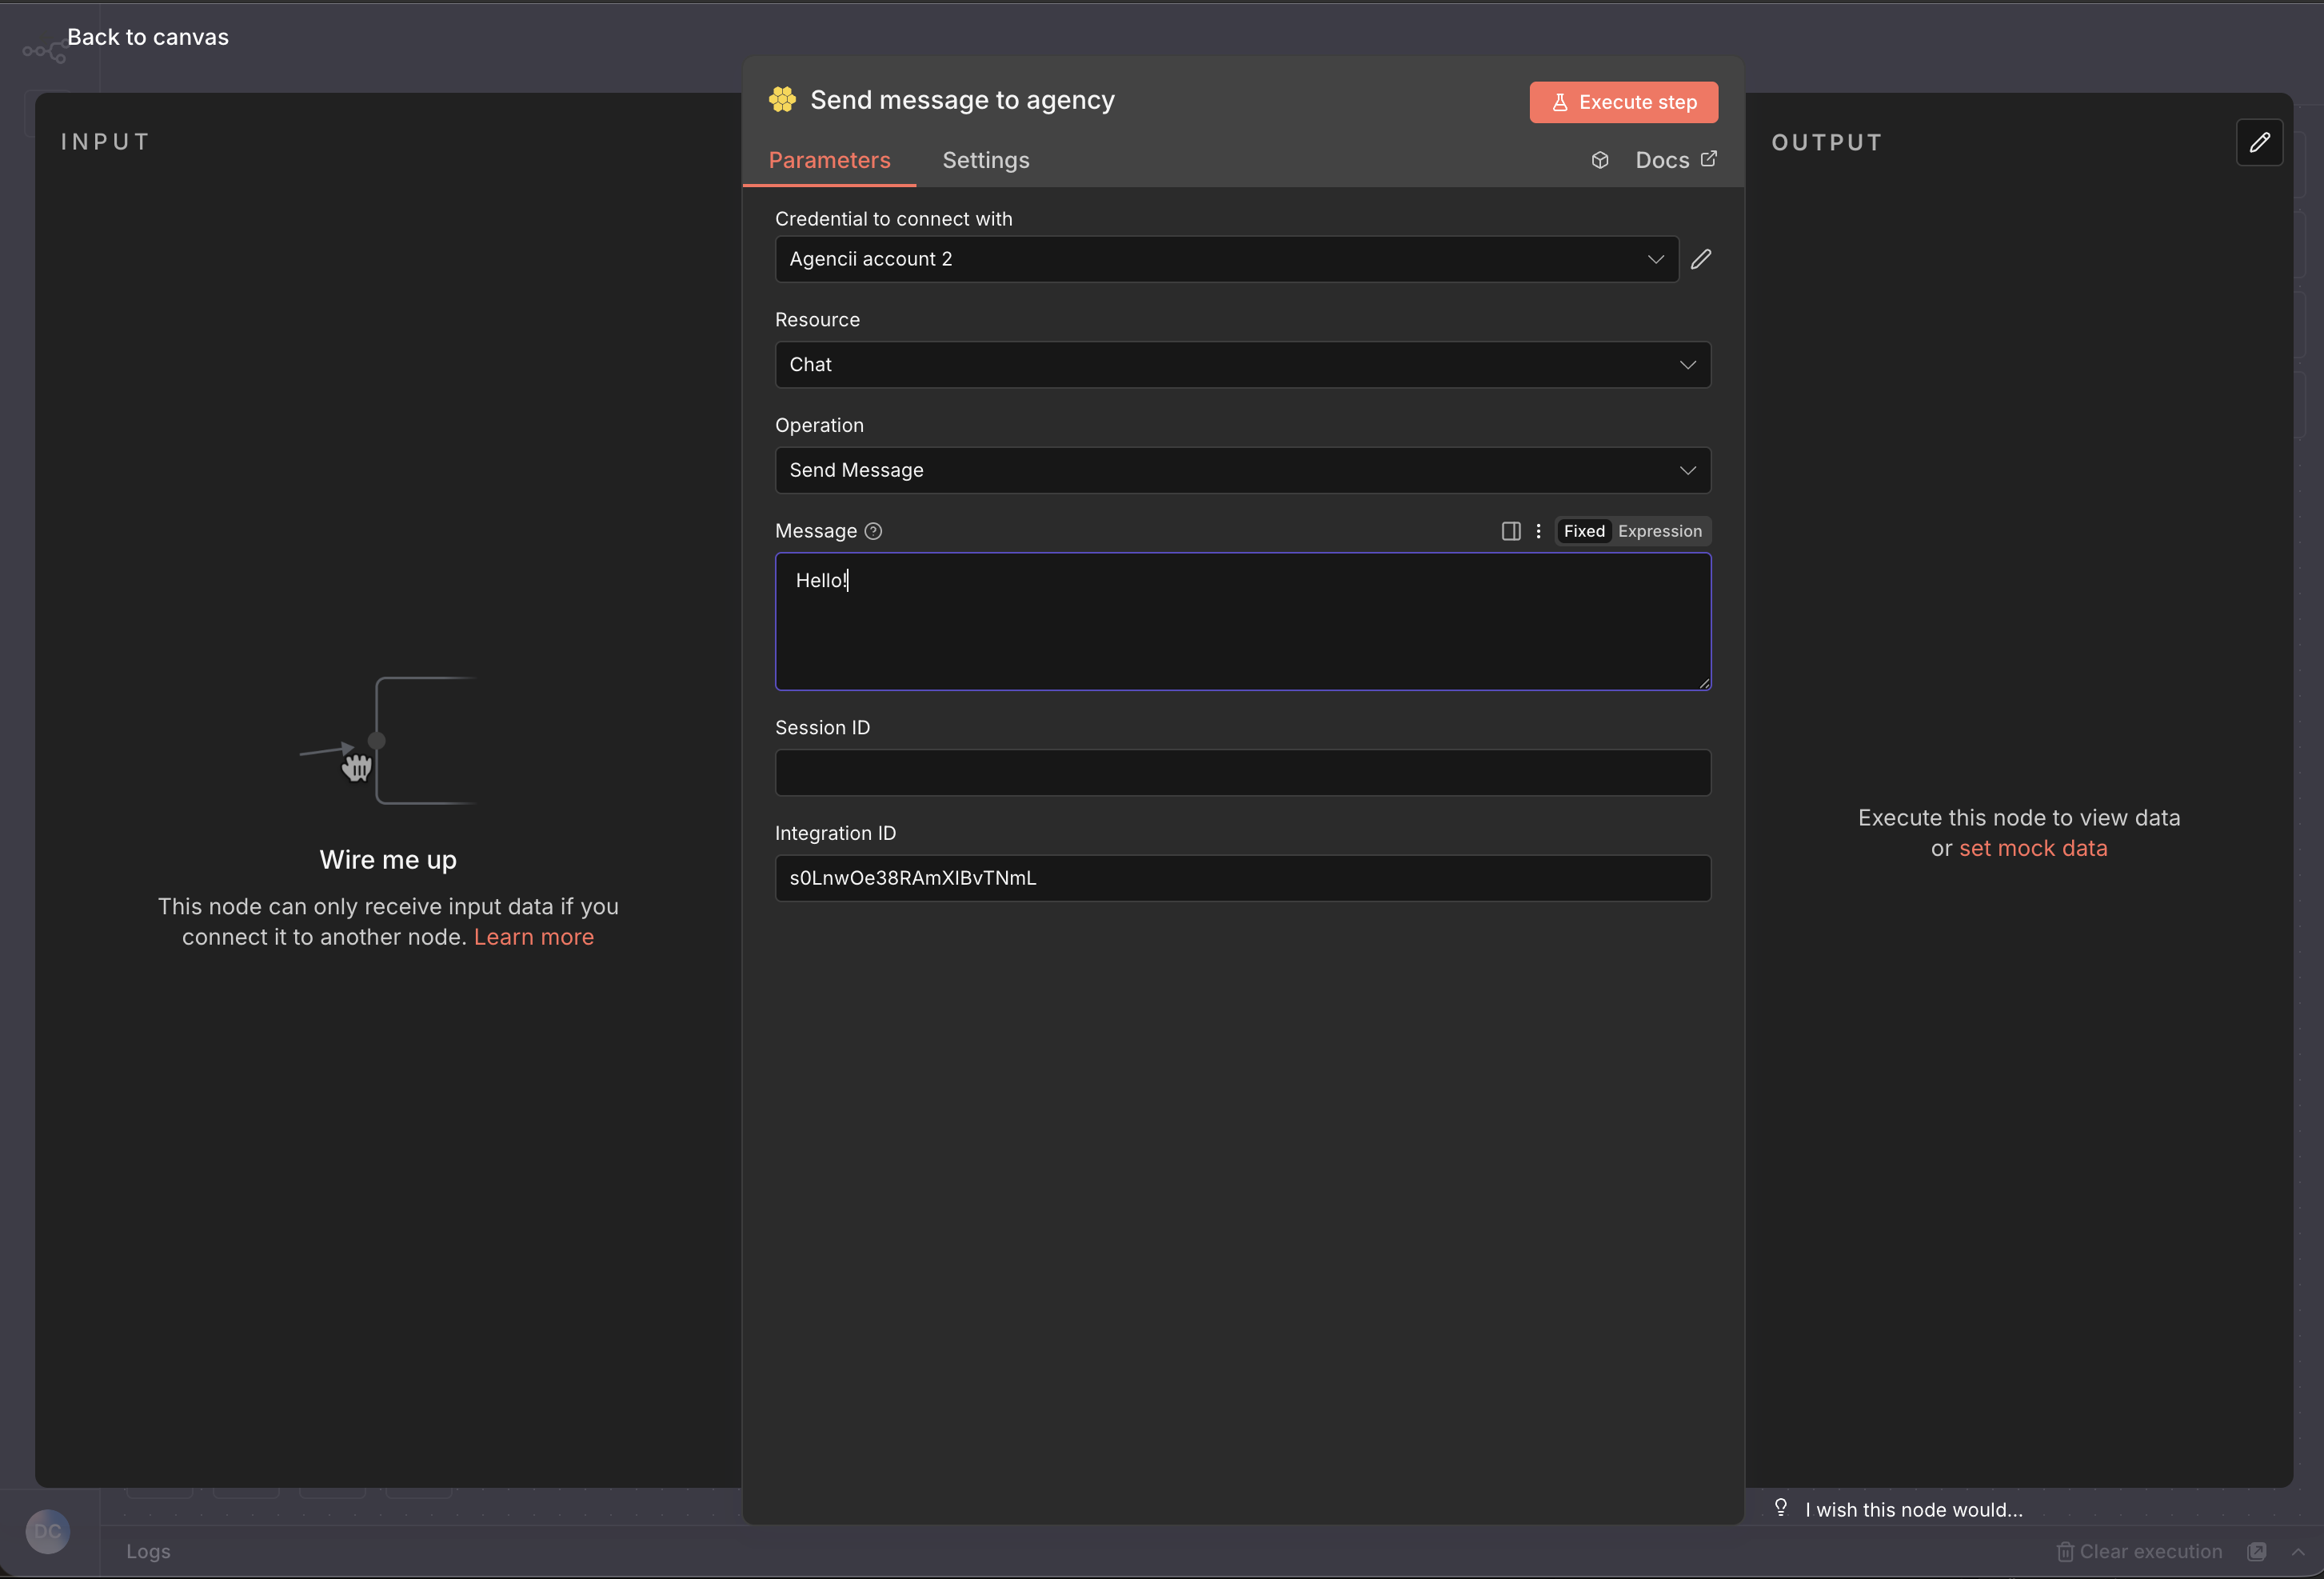 2. Select your **Agencii API** credentials.
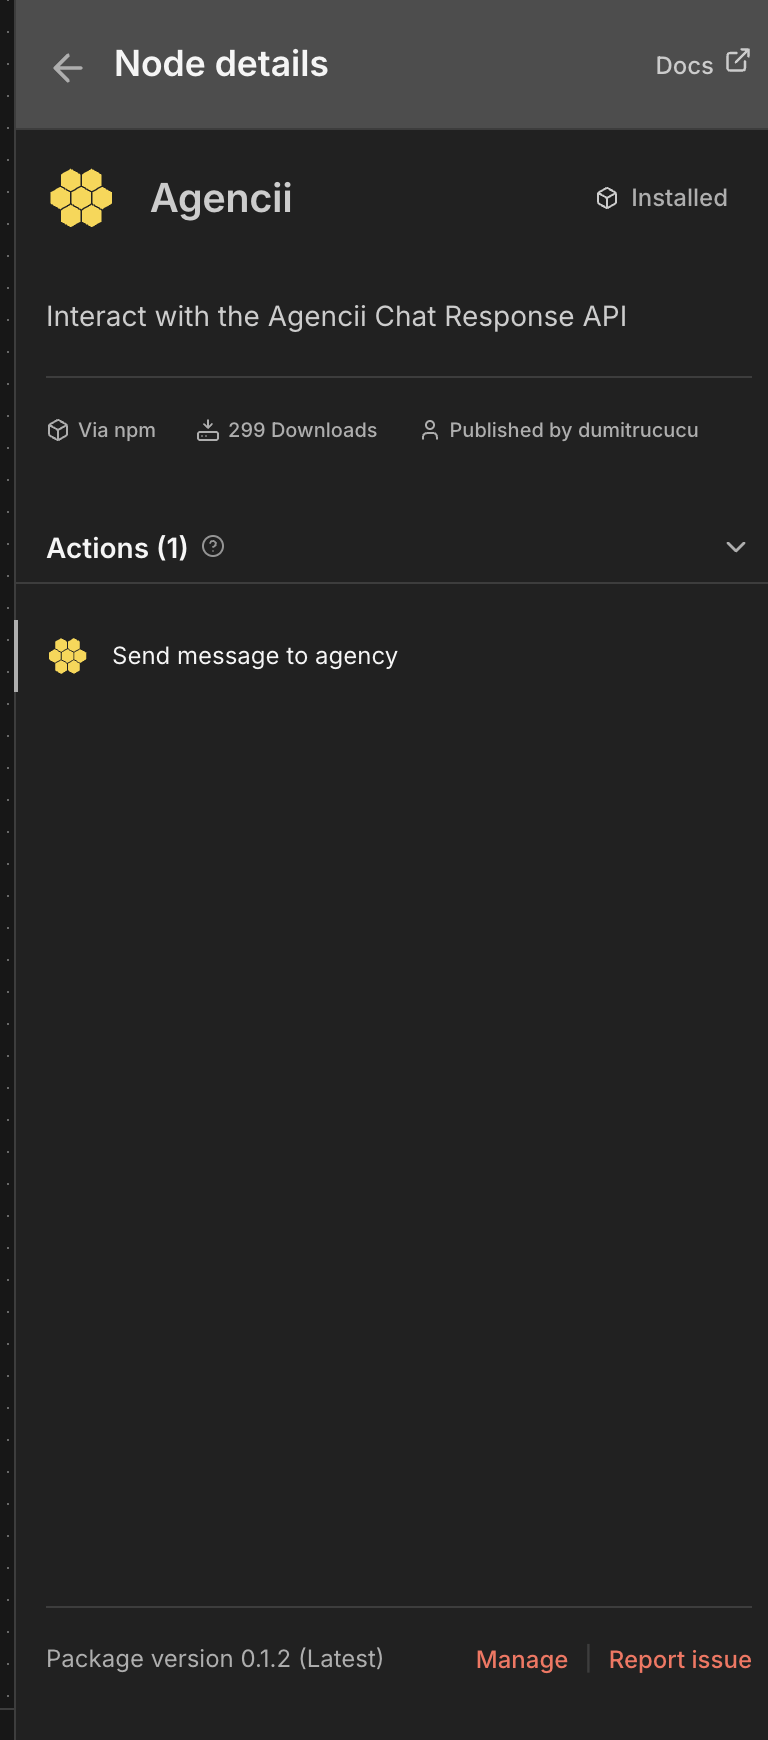
3. Under **Resource**, choose **Chat**, and under **Operation**, select **Send Message**.
4. Configure the main fields:
* **Integration ID** *(required)* – paste the Integration ID from your Agencii n8n Platform integration.
* **Message** *(required)* – the prompt or instruction you want your default agent to process.
* **Session ID** *(optional)* – reuse the `sessionId` from a previous run to continue the same conversation; leave empty to start a new session.
* **User Context** *(optional)* – a JSON object with structured data (user IDs, preferences, feature flags) passed to [Agency Context](/additional-features/agency-context). This data is accessible within your agent's tools but is **not** exposed to the LLM.
The Agencii node returns a JSON payload with (among others):
* `text` / `response` – the main answer from your agency.
* `sessionId` – the session identifier to reuse for multi-turn conversations.
* `n8nIntegrationId` – the platform integration that handled the request.
You can pass these values into downstream nodes (e.g., email, CRM, webhooks) to build complete automations.
## Example Use Cases
* **Human-in-the-loop review** – send form or CRM data to your agency, then route the response into an approval step.
* **Content generation pipelines** – trigger the Agencii node from schedules or webhooks and store generated content in Google Sheets, Notion, or a database.
* **Multi-step analysis** – chain multiple Agencii nodes while reusing `sessionId` to keep context across data enrichment, analysis, and recommendation steps.
2. Select your **Agencii API** credentials.
3. Under **Resource**, choose **Chat**, and under **Operation**, select **Send Message**.
4. Configure the main fields:
* **Integration ID** *(required)* – paste the Integration ID from your Agencii n8n Platform integration.
* **Message** *(required)* – the prompt or instruction you want your default agent to process.
* **Session ID** *(optional)* – reuse the `sessionId` from a previous run to continue the same conversation; leave empty to start a new session.
* **User Context** *(optional)* – a JSON object with structured data (user IDs, preferences, feature flags) passed to [Agency Context](/additional-features/agency-context). This data is accessible within your agent's tools but is **not** exposed to the LLM.
The Agencii node returns a JSON payload with (among others):
* `text` / `response` – the main answer from your agency.
* `sessionId` – the session identifier to reuse for multi-turn conversations.
* `n8nIntegrationId` – the platform integration that handled the request.
You can pass these values into downstream nodes (e.g., email, CRM, webhooks) to build complete automations.
## Example Use Cases
* **Human-in-the-loop review** – send form or CRM data to your agency, then route the response into an approval step.
* **Content generation pipelines** – trigger the Agencii node from schedules or webhooks and store generated content in Google Sheets, Notion, or a database.
* **Multi-step analysis** – chain multiple Agencii nodes while reusing `sessionId` to keep context across data enrichment, analysis, and recommendation steps.